Introduction
One of the simple mistakes I have made in fire modelling is specifying the wrong Heat Release Rate (HRR). This mistake is often realised when results are post-processed at the end of the simulation resulting in wasted days and weeks of simulation.
Although this mistake can be avoided easily by verifying the input parameters in the FDS script or the Pyrosim model, it can be overlooked. The best practice I found to make sure the model correctly produces the heat release rate as required is generating the HRR graph during various time intervals. A simple python script can speed up this process by visualizing the graph, and the script can be reused on other simulations with minor changes.
This article provides a brief introduction to Python and relevant data analysis modules as I break down the script I have used to generate the HRR graph. To follow along with this script, you will need the following software and modules installed on your machine:
- Python
- Jupyter Notebook or any code editor for python
- PIP
- Python modules – Pandas and Matplotlib
Required Software
Python
Python is a very popular programming language that emphasis on code readability. The language is used for various purposes, including software development, web development, data analysis, machine learning etc. You can download and read more about python on the office website python.org.
Jupyter Notebook
The Jupyter Notebook is an open-source web application that allows you to create and share documents that contain live code, equations, visualisations and narrative text. Uses include data cleaning and transformation, numerical simulation, statistical modelling, data visualisation, machine learning, and much more. You can read more about Jupyter Notebook on the office website jupyter.org.
I use Jupyter Notebook to understand the results for every single line of code which makes it easier to troubleshoot the script. It is also a good code editor for anyone interested in data analysis using python.
PIP
In addition to Python, you will need to install PIP. PIP is the package installer for Python which is used to install a third-party module. Two third-party modules I have used in the Python script is Pandas and Matplotlib.
Python Modules
The script presented in this article implements two widely used data analysis packages – Pandas and Matplotlib.
Pandas is a third-party module used mainly for data analysis. It is a fast, powerful, flexible and easy to use open-source data analysis and manipulation tool built on top of the Python programming language. It represents data in a two-dimensional tabular data structure with labelled axes (rows and columns). Data manipulation can be carried out on the data based on the row and column names. You can read more about Pandas on the official website pandas.pydata.org.
Matplotlib is a comprehensive library for creating static, animated, and interactive visualisations in Python. You can read more about Matplotlib on the official website matplotlib.org.
Files
The full python script and relevant FDS files can be found on my GitHub page here: https://github.com/jabirjamal/jabirjamal.com/tree/main/Article1
Python Script
Importing Relevant Libraries
- OS is a Python built-in module that provides functions for interacting with the operating system. The primary use of the OS module is to create or remove folders. Change directory function of the OS module is used in the python script below.
- We need to first install Pandas and Matplotlib to use the module in the script. This can be done easily using PIP. Running ‘pip install pandas’ and ‘pip install matploblib’ in Jupyter Notebook will install the modules on your machine. Once Pandas and Matplotlib are installed, they can be imported into the script, as shown below.
- After initialising the dataframe using pandas, the first 5 rows of dataframe can be visualised using the code df.head() or df1.head(). Similarly, use df.tail() or df1.tail() for the last 5 rows.
import os
import pandas as pd
import matplotlib.pyplot as plt
%matplotlib inline
Read and Print Data
- The following line of code reads the HRR csv file generated by FDS. Edit the script to ensure the link is directing to the correct file on your machine.
# load data to a variable df
df = pd.read_csv(r'C:\Users\JabirJamal.com\Article1\Model1\Model1_hrr.csv')
df.head()
Change Column Name
- The first line of code creates a copy of the Pandas dataframe. The second line of code will rename the column heading with the first row of df dataframe.
# create a copy of the dataframe
df1 = df.copy()

# copy row 0 of df to header of df1
df1.columns=df.iloc[0]
Remove Row 0
- The following line of code removes row index 0 and resets the dataframe.
df1=df1[1:].reset_index(drop=True)
Change Data Type
- The line below changes the datatype to float
df1 = df1.astype('float')
Generate and Save Graph
- The OS module is used to specify the folder location where the image produced by the script is to be saved.
- Pandas plot function is used to generate an HRR graph with ‘Time’ on the horizontal axis and ‘HRR’ on the vertical axis. The image’s title is specified as ‘Model 1: Heat Release Rate (kW)’.
- Matplotlib module is used to label the x and y-axis as ‘Time (s)’ and ‘HRR (kW)’, respectively.
- Matplotlib is also used to specify the x and y-axis limits.
- Finally, the image is saved as a png file.
# change working directory to the location where you would like to save the image
os.chdir(r'C:\Users\JabirJamal.com\Article1\Model1')

# extract x and y columns to generate the graph
df1.plot(x='Time', y='HRR', title = 'Model 1: Heat Release Rate (kW)', figsize=(7,5))

# label x and y axis
plt.xlabel('Time (s)')
plt.ylabel('HRR (kW)')

# specify limits for x and y axis
plt.xlim(0,300)
plt.ylim(0,300)

# specify file name for the image and generate the graph
plt.savefig('Model1_HRR.png', bbox_inches='tight')
plt.show()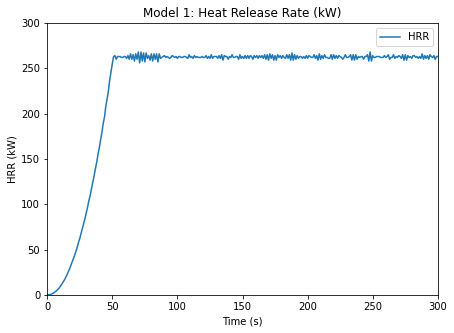
Resources
If you run into any trouble with the installation process, check out these videos:
Installing Python – https://www.youtube.com/watch?v=CJSYgkpb6Y0
Installing PIP – https://www.youtube.com/watch?v=Ko9b_vC6XY0
Installing Pandas – https://www.youtube.com/watch?v=K_Ba7bL8m4Y